Budget Changes
Navigation Path: Cost Management > Budgets > Budget Changes
Budget Requests are used to build a budget incrementally and/or to adjust budgets, often by transferring amounts from one cost code to another. Budget Requests build your budget in discrete transaction. Each can be routed for collaboration using Workflow and budget development history is maintained.
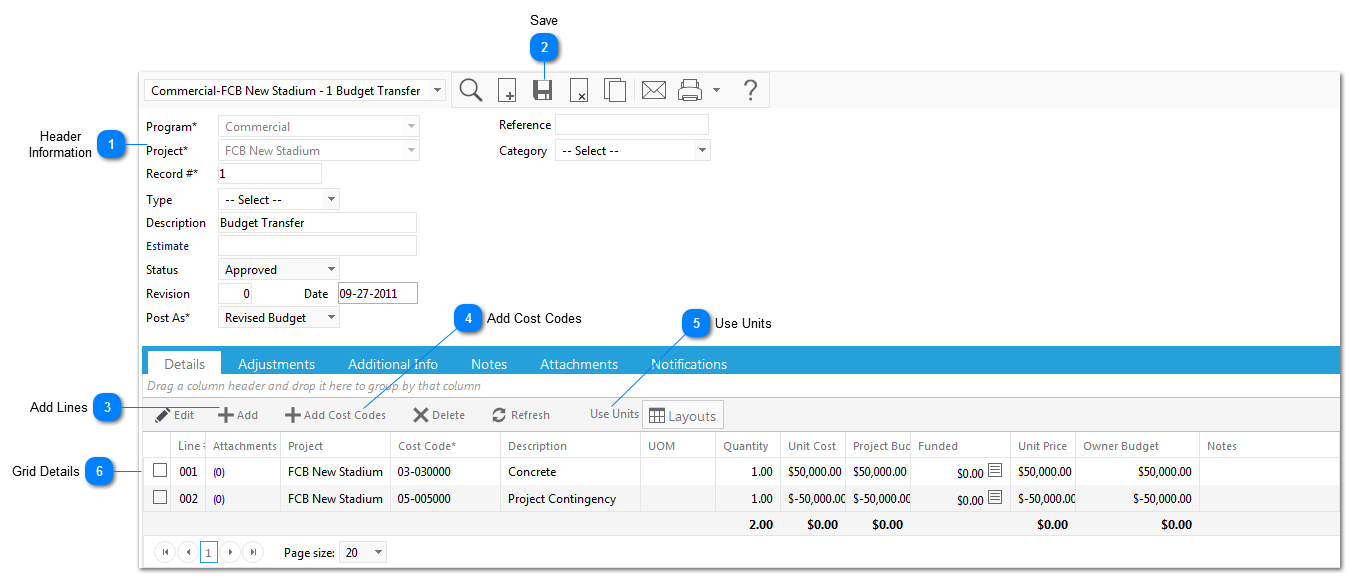
Header InformationFill in the necessary information: * denotes a required field
Project*: use the drop-down list to select the project.
Record #*: this field will be automatically generated once the record is saved, but can be edited.
Type: use the drop-down list to select the type.
Description: add a description.
Estimate: this field will be automatically populated if the budget request was created from an estimate in the Planning module.
Status: this field will be automatically updated if you link a workflow with this record type. If not, you can change it manually.
Revision: this field will be automatically populated by PMWeb (the starting revision number is setup by your PMWeb Administrator).
Date: this field will be automatically generated with today's date.
Post As: use the drop-down list to select "Original Budget" or "Revised Budget". Note: what you choose will determine where the record shows up in reporting and in Cost Worksheets. "Revised Budget" is the most common selection.
Reference: enter a reference.
Category: use the drop-down list to select the category of budget change.
|
Add LinesIn the Details grid, click on the
|
Add Cost CodesIf you want to adjust budgets on multiple cost codes at once you can use the
Select the lines you just added and click Edit to modify the information (See Grid Details section below). Click on
Click on Save again to save your changes to the record.
|
Grid DetailsLine: This field will be automatically populated by PMWeb.
Cost Code: Select the Cost Code associated with the line item.
Description: This field will be automatically populated by PMWeb based on the cost code selected.
UOM: Select the unit of measure from the list values (only viewable if use unit cost is checked).
Quantity: Enter the quantity (only viewable if use unit cost is checked).
Unit Cost: Enter the cost of the line item (only viewable if use unit is checked).
Project Budget: Enter the the approved budget amount for that line item. This field will automatically populate the original Original Owner Budget field if your Settings are set to do so.
Funding: If you have set up Funding Records you can click the icon under the Funding field to set funding percentages or amounts for that line item. The current funding sources will be displayed. Enter either the percentage or cost for each funding source and click save (PMWeb will automatically update either the percentage or the amount fields based on your entry). The funding field will now be populated with an amount based on values entered in the funding screen.
Adjustment 1, Adjustment 2, Tax: These fields will be automatically populated if you add adjustments to the Budget Request record (see the Adjustments section for more details on adding adjustments to Cost Management records).
Company: Select the company associated with the line item if applicable.
Task: Select the task associated with the line item. The options available are based on the tasks established in the schedule module.
Period: If you are using Earned Value features in PMWeb you will need to select the budget/accounting period of the line item, or use the
Start: This field will be automatically populated by PMWeb based on the task selected (based on the start date of the task). This field can also be manually populated.
Finish: This field will be automatically populated by PMWeb based on the task selected (based on the finish date of the task). This field can also be manually populated.
Curve: Select the cash flow curve (bell, linear etc.) of the line item. This can be used in conjunction with the start and finish dates for projecte cashflow reporting.
Notes: Enter details regarding the line item
Location: Select the location (building 1, 2 etc.) associated with the line item. The options are configured by your Administrator in the Porfolio>Lists>Projects menu.
Once all information is entered, click Save.
Note: To hide the fields that are not in use by your organization, right click on any header. Go to columns and uncheck the fields you want to hide then click Save Layout.
|