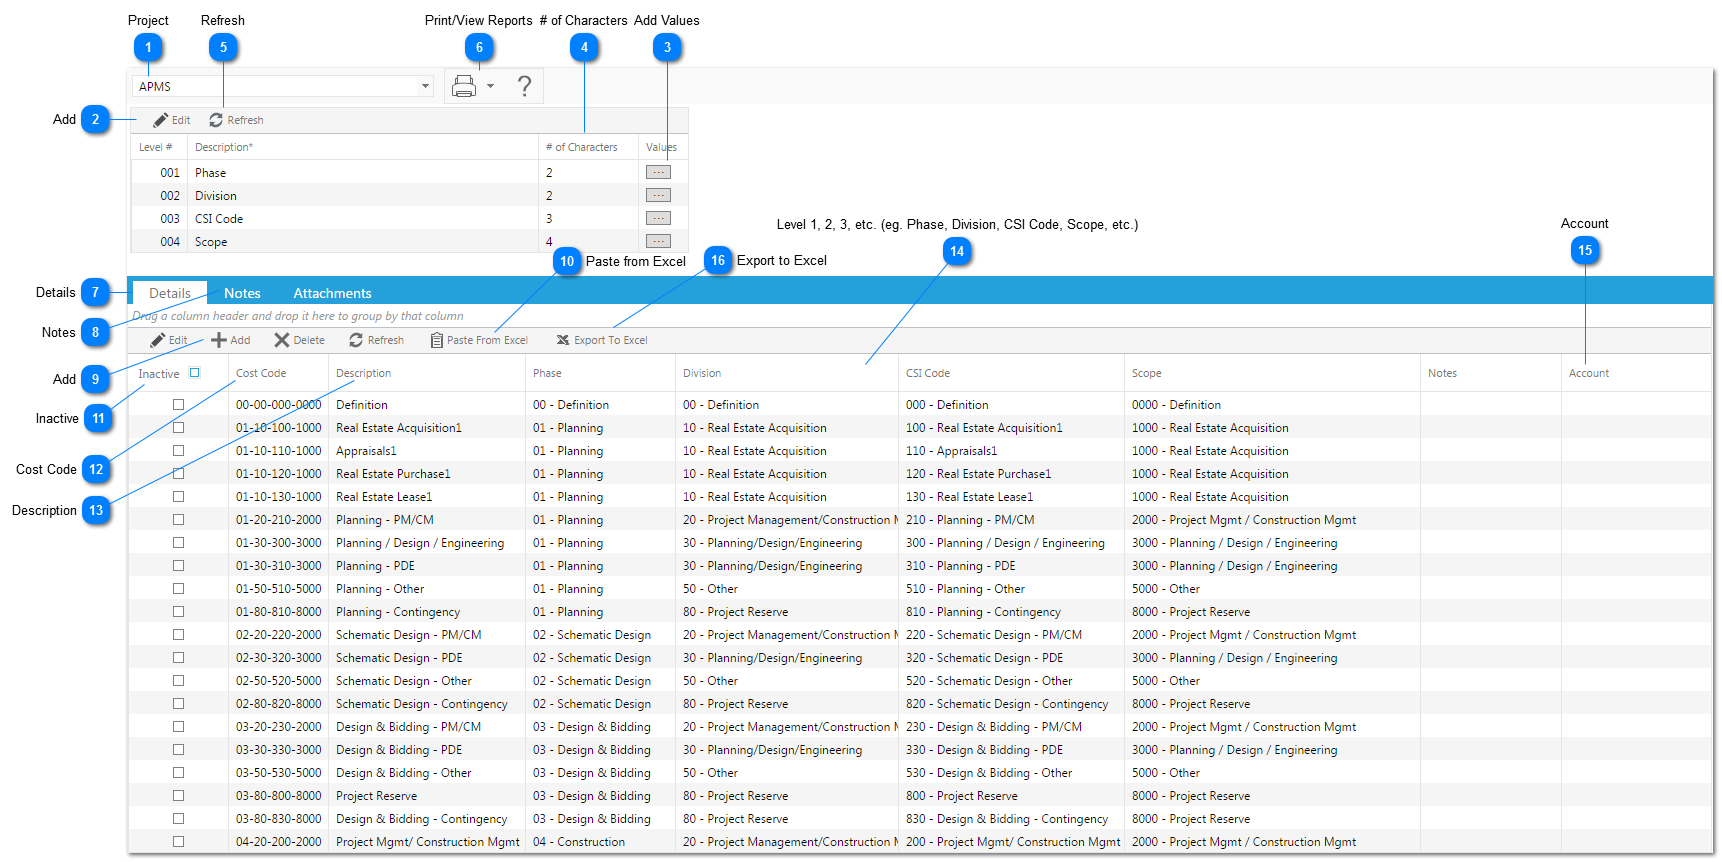
Navigation Path: Cost Management > Budgets > Cost Codes
The Cost Code module is used to create your cost code segments and combinations that are required in order to create your budget. If the cost codes are not first added here, they will not be available in your budget. Cost Codes are also required in the Forecast and Cost Worksheet modules, and can be used in any of the cost management features (contracts, change orders, and invoices). The Cost Code is what ties all of you budget and cost information together.
Note: On the Cost Codes screen, if a user attempts to group via a column that has special characters in the column name (eg. / & () ), the user will get an error message. You cannot group via those columns.
Note: Cost codes can be quickly and easily reused on future projects. In the toolbar of the cost code grid click on the Copy from Project button and select the project that's cost codes you wish to use. .
 ProjectUse to select the project.
|
 AddClick to add Cost Code levels that you will require for this project, you can have as many or as few levels as desired, and each project may have a different cost code structure. Once all the level descriptions are entered, click Save.
|
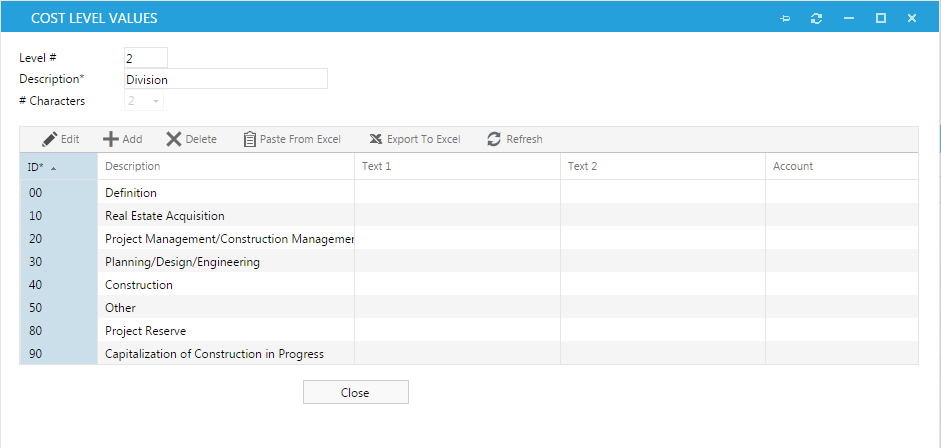
 Add ValuesUse the ellipsis icon  to populate the list of options available for each Cost Code level. The Cost Level Values dialog opens. In this window, select the number of characters using the drop-down list and then click the Add button to create a value line. Click in the ID field and type a value. Press Tab to move to the Description field and type a value. When all values have been entered for the level, click Save and click the Close button. Note: The "export to excel" button allows you to view the data in excel. The "paste from excel" button allows you to import values from an existing excel spreadsheet that resides on your computer.
|
 # of CharactersRepresents the number of characters contained in the levels created. If you wish to change this the entries for that level have to be deleted first.
|
 RefreshClick to refresh the data on the form.
|
 Print/View ReportsClick the printer button to print the form. Click the drop down next to the printer button to view reports associated with the Cost Codes. Once selected, a list of available reports will be displayed.
|
 DetailsThe details tab is where you combine a selection from each of the levels creaded in the levels section to create the actual cost codes that will be used throughout the system. Use the steps below for each cost code you wish to create.
Note: Every level must be used when creating a cost code, and you cannot use the same combination twice.
|
 NotesEnter details regarding the line item.
|
 AddClick to add Cost Codes manually, you can also choose copy from project or paste from excel to bring in data that already exists in another project or that resides on your computer.
The Copy from Project (not shown on the picture) allows you to copy Cost Codes from an existing project. Once selected, a list of existing projects will be displayed. Double click on the project containing the Cost Codes you wish to copy, the Cost Codes will now appear in the details section of the form.
|
 Paste from ExcelClick to import existing data that resides in an excel spreadsheet that resides on your computer.
|
 InactiveBy making the Cost Code inactive it will no longer be available for selection throughout the system. This can be done by your Administrator.
|
 Cost CodeThis field will be automatically populated by PMWeb based on the level information that you select.
|
 DescriptionEnter a description of the line item.
|
 Level 1, 2, 3, etc. (eg. Phase, Division, CSI Code, Scope, etc.)Select the level 1 data associated with the line item. The options displayed are being pulled from the information entered in the section above.
|
 AccountIf you are using Account Codes to map you cost codes to your accounting or other system, you will want to select the account associated with the line item.
Note: These account codes are set up by your Administrator in Portfolio > Lists > Lists on the Advanced tab.
|
 Export to ExcelIf desired you can click this button to export the existing cost code data to excel.
|
|