Navigation Path: Cost Management > Budgets > Forecasts
PMWeb Forecasts are several tools in one:
- an onscreen report of real-time budget, committed cost and actual cost transactions with an optional cost period cutoff,
- a spreadsheet for entering flexible cost projections without having to create formal change orders,
- a place to calculate cash flow in 3 ways: by tying lines to schedule tasks, by manually entering start and finish dates or by projecting across periods,
- an earned value calculator.
Forecasts can be included in cost reports as a separate column or blended with other cost data.
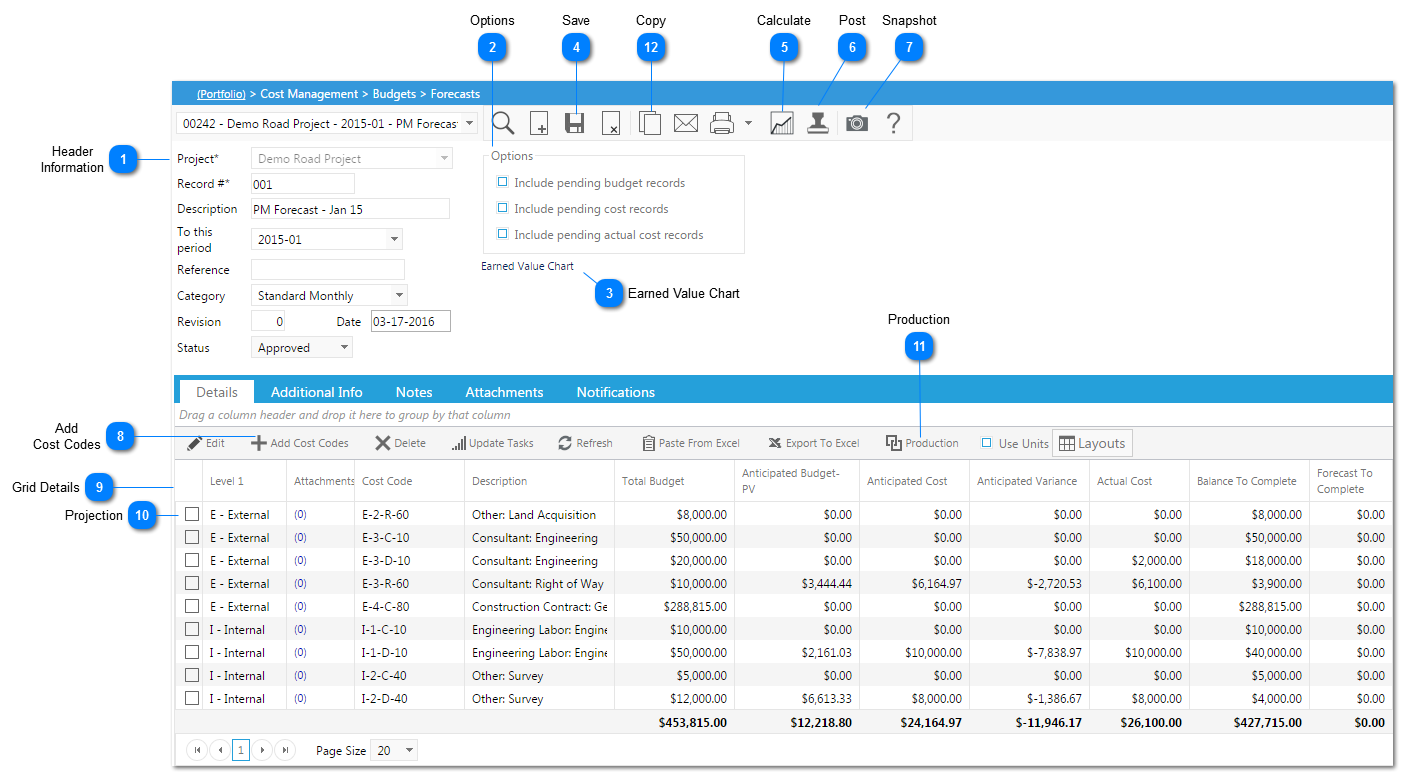
 Header InformationFill in the necessary information: * denotes a required field
Project*: use the drop-down list to select the project.
Record #*: this field will be automatically generated once the record is saved, but can be edited.
Description: add a description.
To this period: use the drop-down list to select the period. Note: if you leave this field empty, ALL budget and cost data for the project will be displayed in the Details spreadsheet. If you select a period, only transactions posted to that period and earlier will be displayed.
Reference: enter a reference.
Category: use the drop-down list to select the category.
Revision: Update the revision number with the actual number.
Date: this field will be automatically generated with today's date.
Status: this field will be automatically updated if you link a workflow with this record type. If not, you can change it manually.
|
 OptionsUse the checkboxes to select what options you want to turn on.
|
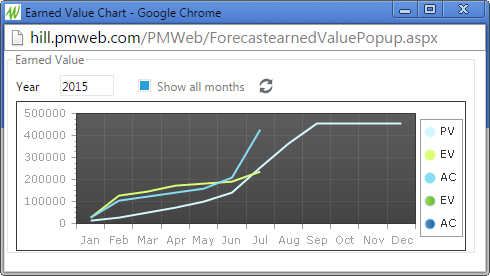
 Earned Value ChartBy clicking on the  link, the Earned Value Chart dialog opens with a chart showing the Planned Value (PV), Earned Value (EV) and Actual Cost (AC) for the selected project.
Note: for this to display properly you must:
1. Use periods in your budget records to spread the budget across periods to create your PV value
2. Use periods on you invoices to calculate the AC
3. Use the forecast % complete to get your EV
|
 SaveClick on the  icon to save your record. |
 CalculateClick the  icon to have the schedule percentage complete and actual costs calculate the forecast to complete. Note: this will override the current values. |
 PostClick on the  button in the toolbar to post a Forecast.
Note: all forecast lines will be posted to the cost ledger and the Post button is replaced by the Unpost button. Forecasts can be toggled this way as often as you wish.
|
 SnapshotUse the  icon to freeze or "snapshot" your Forecast data. By default, each time you load a forecast record, the data in the read-only columns are automatically updated for you with the most up-to-date information. This will happen regardless of the record's workflow status, so to stop automatic updates, click the Snapshot button. |
 Add Cost CodesBy clicking on the  icon, the Cost Codes dialog opens. Drag and drop cost codes from the left hand side to the right and click Save and Close.
The selected cost codes will appear as new lines in the Details spreadsheet. Select the line(s) and click Edit to modify the information then click Update Records to save your changes.
|
 Grid DetailsThe following table describes each of the fields found in the Forecast Details grid:
|
Title
|
Definition
|
|
1. Forecast
|
Method to allow for entering multi-line forecasts for greater detail (Periodic Spread button). This has two methods which are used to spread remaining costs:
(a) Balance to Complete: This is the most common way used to spread remaining costs. It does not update the “Forecast to Complete” field. Also, none of the standard PMWeb reports use this field so users must be aware that custom reports will be required if this method is chosen.
(b) Forecast to Complete: If using Forecast to complete as noted this will only spread your “above and beyond”
|
|
2. Level 1
|
First level of the Cost Code structure
|
|
3. Cost Code
|
Designated when populating the forecast by adding cost codes. This field is read only.
|
|
4. Description
|
This field is auto-populated based on the cost code description but is editable based upon what the end user wants to convey
|
|
5. Total Budget**
|
(Original Project Budget) + (Project Budget Changes)
|
|
6. Anticipated Budget – PV**
|
(Original Project Budget) + (Project Budget Changes) based on the periodic spread on both the Original Budget and Budget Requests up to the current Forecast period (i.e. for this period where we planned on being)
|
|
7. Anticipated Cost t
|
(Original Cost) + (Cost Changes). This includes Commitments + Non-Commitment Costs + Commitment Cos through the current Forecast period If you have used the periodic spread on your Commitments then it will only show the value up to the current Forecast Period
|
|
8. Anticipated Variance**
|
(Anticipated Budget PV) – (Anticipated Cost)
|
|
9. Actual Cost
|
Actual Costs (Committed/Non-Commitment) through the current forecast period
|
|
10. Balance to Complete**
|
(Total Budget) – (Actual Cost)
|
|
11. Forecast to Complete t
|
(Original Cost) + (Cost Changes)-(Actual Costs - Commitments)-(Actual Costs - Non-commitments). This field can be manually entered or if you use the periodic spread for that Forecast line item it will be filled in by PMWeb. It is intended to be the place holder for anything over and beyond what is already in your anticipated costs (the difference between what your actuals are and what you believe you have left). This is the field that will show up in the cost ledger/cost worksheet as “Forecast-Approved”.
|
|
12. Period
|
Monthly period
|
|
13. Forecast at Completion t
|
Anticipated Cost + Forecast to Complete
|
|
14. Forecast Variance**
|
(Total Budget) – (Forecast at Completion) (tells me if I am over budget or not)
|
|
15. Task
|
If there is a schedule associated with the project, tasks from the schedule, as well as start and finish dates can be associated with this forecast
|
|
16. % Complete
|
Estimate of Percentage Complete. If you have linked a task (see item 15) from the schedule to this line, this field can be updated from the schedule when you click on the “Update Tasks” button. Otherwise you can manually update the percent complete.
|
|
17. Notes
|
Notes are available for any line item. They are also available for the overall forecast by utilizing the Notes tab.
|
|
18. Start
|
If a Task is selected, this will auto-populate with the start date of that task in the Schedule. Otherwise it can be manually entered.
|
|
19. Finish
|
If a Task is selected, this will auto-populate with the start date of that task in the Schedule. Otherwise it can be manually entered.
|
|
20. Curve
|
This curve can be used by custom reports to spread the forecast based on the Start and Finish dates (items 18 and 19). This would only be done if the user decides not to use the periodic spread outlined in item 1 above. They method requires a custom report, as all the default reports in PMWeb use the periodic spread.
|
|
21. EV **
|
Earned Value = (Total Budget) * (% Complete)
|
|
22. CV**
|
Cost Variance = (EV) – (Actual Costs)
|
|
23. CPI**
|
Cost Performance Index = (EV) / (Actual Costs)
|
|
24. SV**
|
Schedule Variance = (EV) - (Anticipated Budget – PV)
|
|
25. SPI**
|
Schedule Performance Index = (EV) / (Anticipated Budget – PV)
| |
 ProjectionBy using the  button on each line item, the Projection dialog opens. Use the drop-down options to select the Field, the From and To periods and the Curve. If you add an amount to the Amount field and click on the Projection button. The amount you entered is spread across the selected range of periods using the chosen curve method. The information appears in the spreadsheet and on the graph, and the projections can now be used in reports.
Note: if you click the Projection button a second time, new lines will be appended to the projection spreadsheet. If you do this inadvertently, you can delete the extra lines. If you want to change your projection, you will need to delete the lines that were created by the previous one.
|
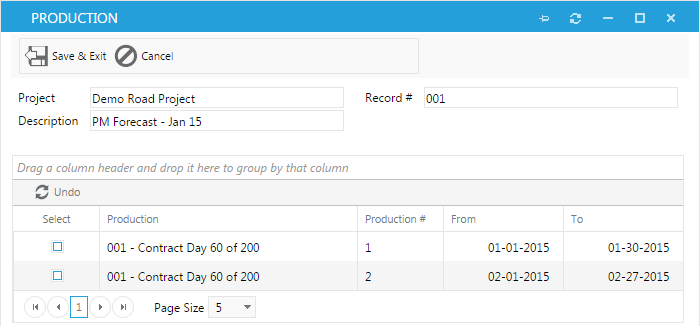
 ProductionIf you are tracking units installed in the Production module, you can click on the  icon to open the Production dialog. Select previously created Production records you want to pull into this forecast, and click Save & Exit.
The selected Production lines will update the " Quantity Completed" field for each of the corresponding line items in the Forecast. |
 CopyTypically project or cost managers will create a new forecast each month, using this  button to copy the previous month's forecast. |
|