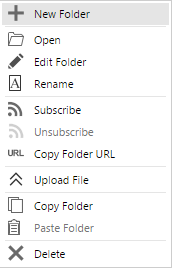
Right click on the folder name and a menu will be displayed:
New Folder: Click to create a new folder.
Open: Click to open folder and sub folders
Edit Folder: Click to open the Edit Folder dialog. See next section for more details.
Rename: Click to change the name of the folder
Subscribe/Unsubscribe: Click to subscribe/unsubscribe to folders. By doing this you can choose to select to receive emails/onscreen messages regarding the folder.
Copy Folder URL: click to open a Folder URL dialog from where you can copy the URL address of this folder.
Upload File: Click to upload a file.
Copy Folder: Click to copy a folder and/or contents.
Paste Folder: Click to paste a folder that was copied.
Delete: Click to delete a folder or file.
Attributes: Click to view the document "tags".
Permissions: Click to view or set permissions for a folder or file.
Note: All folders are controlled by permissions set up by your Administrator. All users may not have all options available.
Use to group files. To group, drag a column header and drop it in this area. Your view will now be grouped by the selected item. To ungroup, drag it back to the grid.
Click to upload a file to the document manager. Be sure that the folder you want to upload to is highlighted. You can also use the folder menu (see #2) to upload a file. If you are uploading a modified version of an existing document, be sure the name is exactly the same as the existing document or the system will not recognise the file as a new version.
Click to select a file. Once selected, a menu will be displayed that will allow you to upload, download, copy, paste, check out/in or delete the document and open the PMWeb viewer (see PMWeb Viewer section) which allows you to mark up a document. If the versioning has been enabled to your folder (see next section), the Show Latest Versions Only will be available for you. By choosing it, you will only see the latest versions of the uploaded documents rather than all versions.
The checkmark to the left of the file name indicates that the file is checked out by another user.
Displays all information regarding the files that have been uploaded including: file name, size of file, type of file (jpeg, word, etc.), the date the file was uploaded, the name of the person who uploaded the file and the date the file was checked out and by who.
Use to set up document "tags". This will require that any document uploaded for a particular folder will need to be tagged with additional information. Example: Meeting Minutes folder would be set up with meeting type drop down lists.