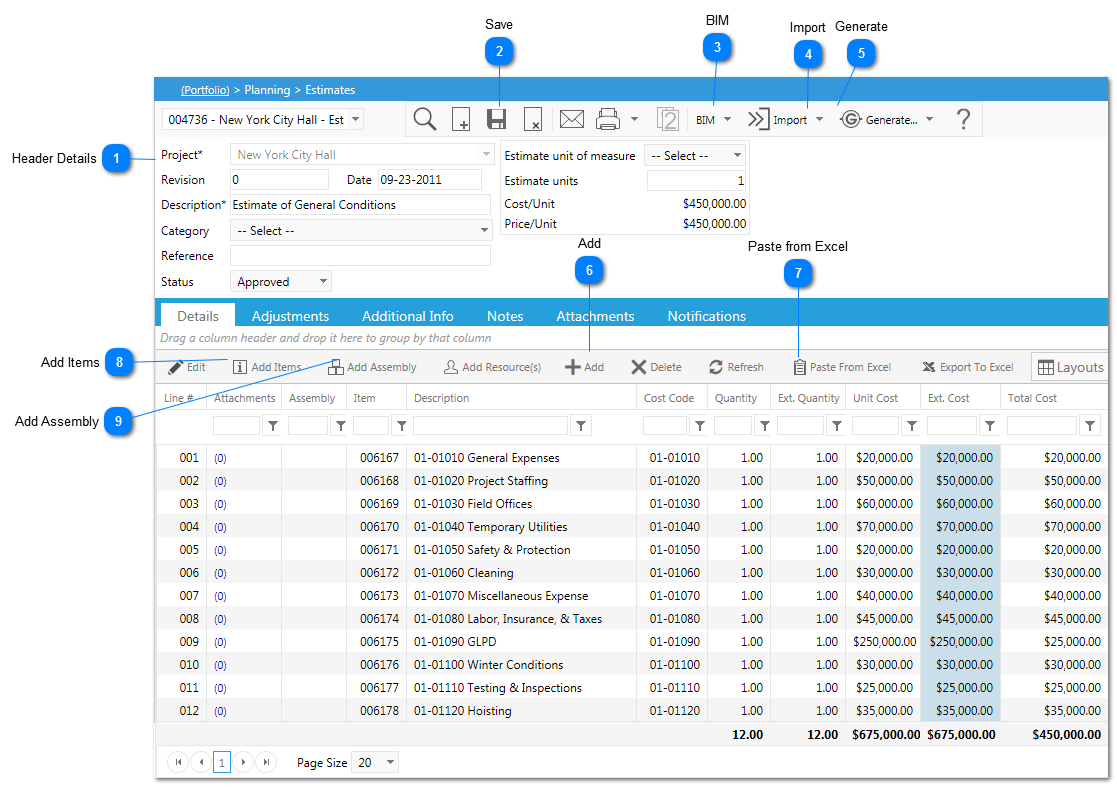
An estimate is a more high level breakdown of cost/line items. Estimates are created and edited in the Estimates window. Each estimate is linked to a project or initiative and each project can have one or more estimates. In addition, users can generate estimate revisions with the click of a button. A revision is a complete copy of an estimate that can then be modified, leaving the original version unchanged. Multiple revisions can be generated, allowing for what-if estimating while retaining estimate development history.
Header Details
Fill in the following information on your record header: * denotes a required field
Project*: Select the project or initiative for the estimate. Once the estimate has been saved, this field cannot be changed.
Revision: This field is auto populated. You may create as many revisions to the record as you wish, only the newest revision will be editable.
Description*: Enter a description for the estimate.
Category: use the drop-down list to select the Category.
Reference: add a reference.
Status:this field will be automatically updated if workflow has been configured with this record type. If not, you can change it manually.
Estimate unit of measure: Select a unit of measure to be used to analyze the estimate.
Estimate Units: Enter the # of units to use in conjunction with Estimate unit of measure.
Cost Unit: This is a self calculating field. Calculation = Total Cost of the estimate divided by the Estimate Units entered.
Price Unit: This is a self calculating field. Calculation = Bid Price of the estimate divided by the Estimate Units entered.
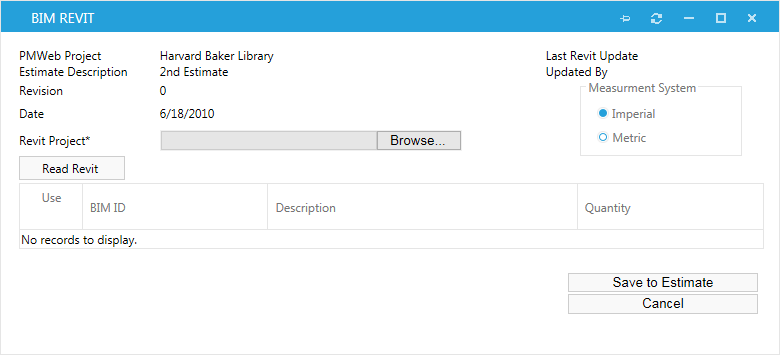
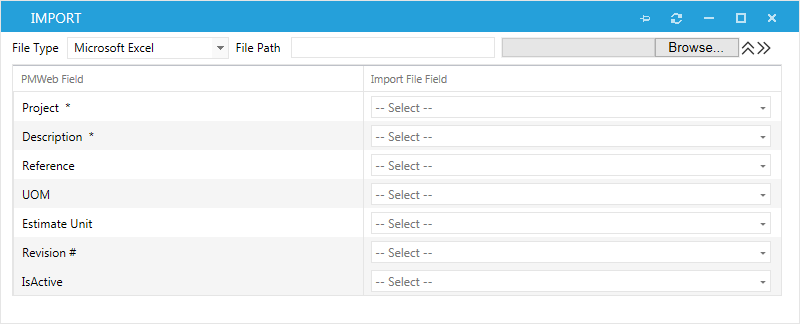
PMWeb allows you to use BIM takeoff information for your PMWeb estimate. Follow these steps to create a Microsoft Excel file to Export your data from Revit:
1. Create an empty Microsoft Excel workbook and save in in Excel 97-2003 (*.xls) format.
2. Open an Autodesk Revit project.
3. Click the Home button above the ribbon to open the menu.
4. Select Export/ODBC Database from the menu. The Select Data source dialog opens.
5. Click the Machine Data Source tab, select Excel Files in the list and click OK to open the Select Workbook dialog.
6. Navigate to the workbook you created in this step#1, select and click OK. The dialog closes and the data from your Revit project is written to the workbook.
7. In PMWeb, open an estimate.
8. Click on the and select Revit from the drop-down list. The BIM Revit dialog opens.
9. As the Revit Project*, choose your exported file and upload it. Click on the Read Revit button, so PMWeb can read the workbook and displays the takeoff data it extracts in the dialog grid.
10. Check the "Use" checkboxes for each BIM ID item(s) you wish to include in the estimate.
11. Click the Save to Estimate button to close your dialog and add your Revit takeoff data to your PMWeb estimate.
Key Points to Successful Linking:
- PMWeb matches the Typeid field in the Revit file to the BIM ID field in the PMWeb item catalog. If no item in the PMWeb catalog contains a BIM ID matching a Revit Typeid, that Typeid is ignored and will not be displayed in the BIM Revit dialog grid.
- PMWeb quantifies Revit instances differently, depending on their type.
- Some tabs in the Revit file are ignored by PMWeb.
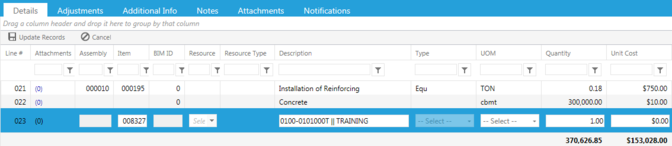
Click Ctrl+C to copy the data sans Header row from an MS Excel spreadsheet. Click Paste from Excel and click Ctrl&V to paste the estimate details into PMWeb.
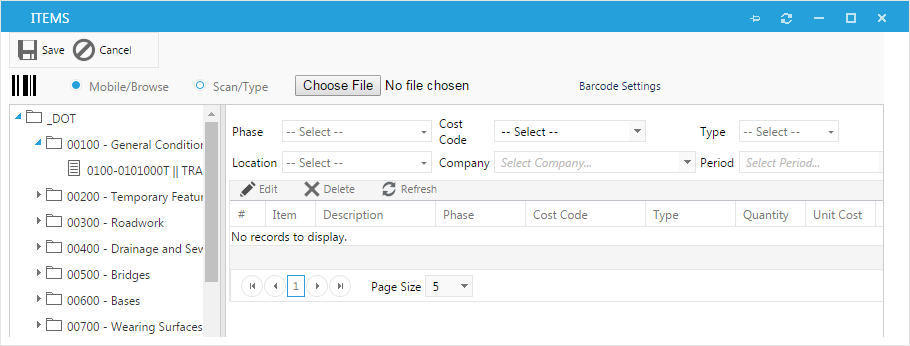
If you click on the button, an "Items" dialog box will open. Here you can drag&drop predefined items from the left hand side to the right hand side. When you selected all your items, click Save to close the dialog. The new items appear in the Details grid.
Select the line(s) and click Edit to type the Description, select the Type, UOM, Quantity and Unit Cost.
Click on the Update Records button to save your changes.
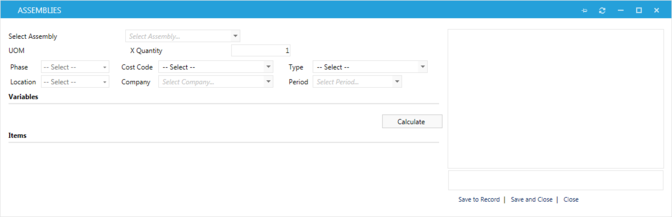
By clicking on the button, the "Assemblies" dialog opens. Use the drop-down list to select your Assembly.
In the Variables grid add the Quantity and click on the Calculate button. Click on the Save and Close to close the dialog. The new items appear in the Details spreadsheet.
Note:Assemblies are setup by your PMWeb Administrator.