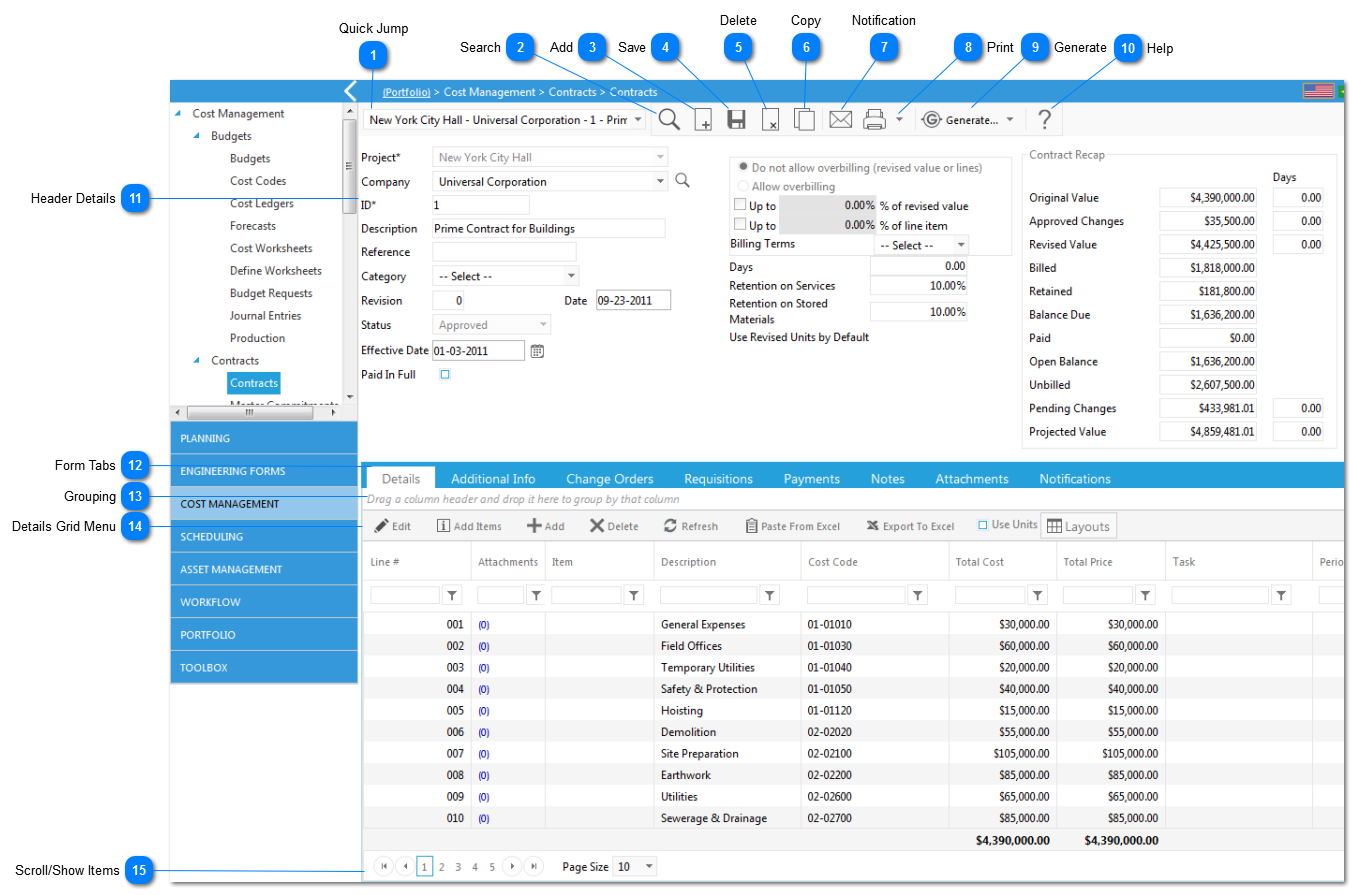
Once you open a record from the manager page, a screen will be available where the detailed level information for the particular record is entered or modified. The fields and features may vary based on the record type selected, however the majority of the functionality is consistent/identical across record types.
 Quick JumpUse the down arrow or type the description in the field to quickly jump to another record for the same form.
|
 Search Use to go back to the record list described in the previous section. |
 Add Click to create a new blank record. |
 Save Click to save any changes to the record information.
Note: for new records, you must save the header before you can add information to the Details grid.
|
 Delete Click to delete the current record.
Note: Once deleted, the form cannot be recovered.
|
 Copy Click to copy the existing form. |
 Notification Click to send an email notification to someone to take action or as just a CC using the Notification Wizard. See the Notifications section for more information. |
 Print To print the form, click on the down arrow next to the print icon and select "View Reports". Once clicked, you will be directed to the reporting preview screen which has a select set of reports you can preview and export to PDF for printing. |
 Generate Click to generate other documents (transmittals, multiple revisions, change events, etc.). Click to generate other documents (transmittals, multiple revisions, change events, etc.).
Note: the available options are dependent on the form.
|
 Help Use to find documents to help filling out your records. |
 Header DetailsThe header details provide the basic data for all forms. This data will need to be saved (see the Save icon) in order to enter data in the details section of the form.
|
 Form TabsThese tabs provide additional details relating to the record. All forms may not contain the Workflow tab (depending on whether or not the workflow was set up by your Administrator).
Details: Displays more information about the record often entered in a grid.
Specifications: Custom fields that can be created on a project by project basis. These fields are configured by your Administrator.
Notes: Use to add additional notes/details relating to the record. See the Notes section.
Attachments: Use to upload/attach reference files to the record. See the Attachments section.
Workflow: Use to automatically route the record to a pre-defined set of approvers/reviewers. This is configured by your Administrator. Please see the Workflow section.
Notifications: Contains a log of all of the notifications that have been sent for this record. Please see the Notifications section.
|
 GroupingUse this feature to create different views of the form by dragging the column headers (date, revision, etc.) to this area. Once you are done setting up the views, click Save Layout. To revert back to the original/default layout click on Load Default Layout.
|
 Details Grid MenuMany of the Details tabs in the records contain a grid where multiple items can be entered. This can also be used to setup your views/layouts. Note: this menu will not be displayed until the header details are saved. Some of the options below may not be on some form types.
Edit: Use to modify existing line items. To modify, highlight the line item(s) and click Edit. Once complete, you must click Save or Update Records (depending on record type).
Add Items: Use to create a line from a record in your Items catalog. Note: This option may not be available on certain forms.
Add: Use to add a new line item.
Delete: Use to remove an existing line item. To remove, highlight the line item(s) and click Delete.
Refresh: Use to refresh the data that is displayed in the form.
Paste from Excel: Use to import data from an excel spreadsheet located on your computer or somewhere outside of PMWeb. To import, once selected, an import screen will be displayed and you will be prompted to upload the file you want to import. In addition, you will be prompted to map the column headers to the column headers or fields that exist in PMWeb. If the column headers differ, you will need to choose the mapping. If the column headers in the spreadsheet are identical to the PMWeb fields, the fields/columns will automatically be mapped. Once mapping is complete, click Import. The data from your spreadsheet will now be populated in PMWeb. Note: This option is not available on all form types.
Use Units: Click to show and utilize unit cost columns.
Export to Excel: Click to export the Grid data to MS Excel.
Layouts: Use to manage layouts.
|
 Scroll/Show ItemsUse to scroll through records for that form (typically used if there is a lot of data, several pages, etc.). The page size displays the number of records you want to appear on the screen. Utilize the drop down menu to select the number of items.
|
|